The following is a very cool step by step Sticker Tutorial on how to create some custom Clear Vinyl Laptop Stickers, that will glow when placed on your laptop…

Hello sticker maniacs, this is Chris Parks, (AKA Pale Horse) from Tampa Bay, Florida. In this tutorial I wanted to share with you, the process I used to create my latest, clear vinyl sticker based custom laptop stickers. I’m also going to walk you through the file set-up steps to get your stickers printed and die-cut with the dudes at Sticker Robot!
This clear vinyl sticker is extra special because it is designed to fit perfectly over the glowing logo on your Apple laptop and has the power to transport onlookers into alternate dimensions of time and space. This is of course not limited to just Apple products, you can customize your own laptop, tablet or even phone using this technique.
Below is a shot of the final result. Warning: Don’t gaze too long if you want to stay in this dimension and finish the tutorial.

Note: On a Mac, the Apple Logo can be extremely bright, and even with 2 barrier coats of white, the entire logo will shine through the transparent sticker material. Try reducing the monitor brightness to a low setting for optimum results.
Form Your Rough Concept
To get started, I looked through my sketchbook of super quick, (often really crappy) pencil sketches to see if there was anything useful to work with. Lately I’ve been doing a lot of fast sketches to capture new ideas, dreams or visions that pop into my head. In this stage, I’m not too concerned with making a technically good drawing. The goal is just getting the idea down on paper and out of my head to remind myself of it later.
I found a couple old Cyclops-looking scribbles that I decided to run with for a big, glowing eye concept and I took some shoots of the sketches with my iPhone.

Refine That Crappy Sketch
Now it’s time to go digital. First, I imported and opened up a pencil sketch .jpg in Photoshop and added a light blue adjustment layer to make it easier to draw on top of. Next, I created a new layer and started refining the sketch with my Wacom Cintiq tablet. In this phase, the concept starts to evolve and develop, but it’s still just a rough drawing to be refined again.

If you are curious about how I set up my brushes, check out the screenshot below for the custom settings I use to get this look. Nothing too fancy here, but I’ve tried a lot of settings over the years and these are my favorites to get this natural, soft shaded look.

Once the rough drawing starts looking pretty good, I selected the left side, duplicated and flipped it to keep the design symmetrical.

Make It Fit
Now it’s time to position the rough drawing to make sure it will work well with the glowing laptop logo. I copied an Apple logo from a Google image search and pasted it on top of my design to make adjustments to best fit the size and shape. I also busted out my handy ‘machete ruler’ and measured the logo on my laptop to make sure everything would line up nicely. It’s also a good idea to print out your design and hold it over the Apple logo, just to make sure you’ve got it sized correctly and you like how the sticker will look in real life.


I decided to draw in another monster getting wild in the background, with one stoned eye and one wide open to make use of the glowing leaf area. At this point, I thought it also needed something else to complete the piece, so I also added a geometric, pyramid background to the design to complete the rough sketch. It’s now ready to be rendered up!

Render It Up
Alright! Now it’s time to get serious and precisely render up the final artwork. First, make sure that your file is set to up as CMYK and that is at least 300 dpi at the final size. (I like to work in at least 600dpi or higher, so I can zoom in on the details without pixilation)
Let’s start with the background first. I created the pyramid shape in Adobe Illustrator, then copied & pasted it on top of my sketch on a new layer. Next, I added a ‘layer mask’ to hide the areas I was about to draw in. I also temporarily set the layer ‘blend mode’ to ‘multiply’ to make it easier to see the sketch.

For the solid, clean lines I set my brush to the settings below:

I went through and carefully outlined my sketch with all the solid black lines that it needed for the main shapes.

From here, I switched back to my soft brush settings (see previous brush settings) and started painting in the shading details, color and highlights. I do all of my black shading on one layer and add color and highlights afterwards, but you can work however you want. I also always keep everything on separate layers, so that I can easily adjust anything as I go along.

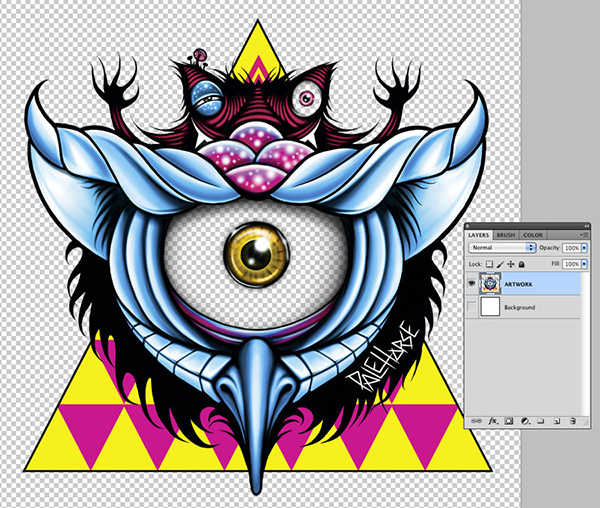
After spending some time honing in on the details, the illustration finally matches the vision I had in my head. Now, it’s time to get the file set up for printing my clear, die-cut vinyl sticker.

Clear Sticker Printing Set-up
Setting stickers up for clear vinyl is actually pretty easy. I just leave the area that I want clear as a transparency layer in the background, so that whatever is transparent in my file will not be printed. Sticker Robot will then, back all my artwork areas with a thick coat of white ink.
To accomplish this, I start by merging my artwork into one layer on top of a transparent background. (I also reduced my file size down to 400 dpi instead of 600+.) You’ll notice that I left the 2 eye areas transparent so that the Apple logo will glow through the design when it’s stick on.
Die-Cut Sticker Printing File Set-up
Now that the artwork is ready to go, the next step is to create a die-cut line around my creation so that the sticker will get cut to the custom shape that I want. Using the ‘Magic Wand’, I select the transparent background area and inverse it to get a nice selection around my artwork. For custom die-cut shapes, Sticker Robot requires that your cut line is at least 1/8 in. away from your artwork.
To do this, I turned on the rulers to measure and pulled out some guides to see where my cut needed to be. I then went to the dropdown menu and choose ‘Select – Modify – Expand’ and set my selection to expand by 50 pixels, so that it was at least 1/8 in. away from my artwork. (Note: the amount of pixels you expand by will depend on your sticker size and file resolution, so just experiment with this until you find the magic number)

On a new layer, I fill the selection with 100% magenta to get the basic custom shape.

Since my artwork has a lot of odd areas and nooks, I decided to smooth it out so that my shape was not too complex and had nice clean edges for my custom die-cut shape.
For this task this, I grabbed my Wacom pen again with the hard brush settings and just fixed problem areas by drawing on top of them and smoothing things out.
(In the photo below, you’ll see that I also temporarily set the ‘layer blend mode’ to ‘multiply’ so I could see my artwork behind the shape)

Once I had had the smoothed out shape, I made it a selection and created a new layer called “Die-Cut” and gave the selection a 2-pixel stroke to indicate the cut line.
(I also deleted the original filled-shape layer, as I no longer needed it)
Now, I just save my finished, layered file as a .psd and I’m ready to create the artwork for the back of my laptop sticker.

Get your Artwork on the Back Too
I also always take advantage of Sticker Robot’s sticker back printing upgrade. This is an option where you can create black & white, or grayscale artwork to be printed on the actual paper backing that peels off your sticker.
After my front artwork file is saved, I hit ‘Save as’ and save this second file as “PH_Sticker-Back.psd“
I then went to the menu dropdown and choose: ‘Image – Image Rotation – Flip Canvas Horizontal’. Next, I deleted the artwork and replaced it with one of my custom pattern files and added my social media info so people could connect with me online. (I think this is a great way to promote your urls and any other info with your sticker, without compromising the actual artwork on the front.)
That’s it! Now, just hit ‘Save’ and you are ready to order your stickers!

Get ‘Em Printed!
After completing the artwork setup, I jumped on Stickerobot.com, went to the custom laptop stickers page and clicked ‘Order Stickers’ and went through the simple guided steps to place my order. Then, I uploaded my artwork files for print and counted the days ‘till these bad boys arrived!
Here’s a Look at the final Custom Printed Laptop Stickers!
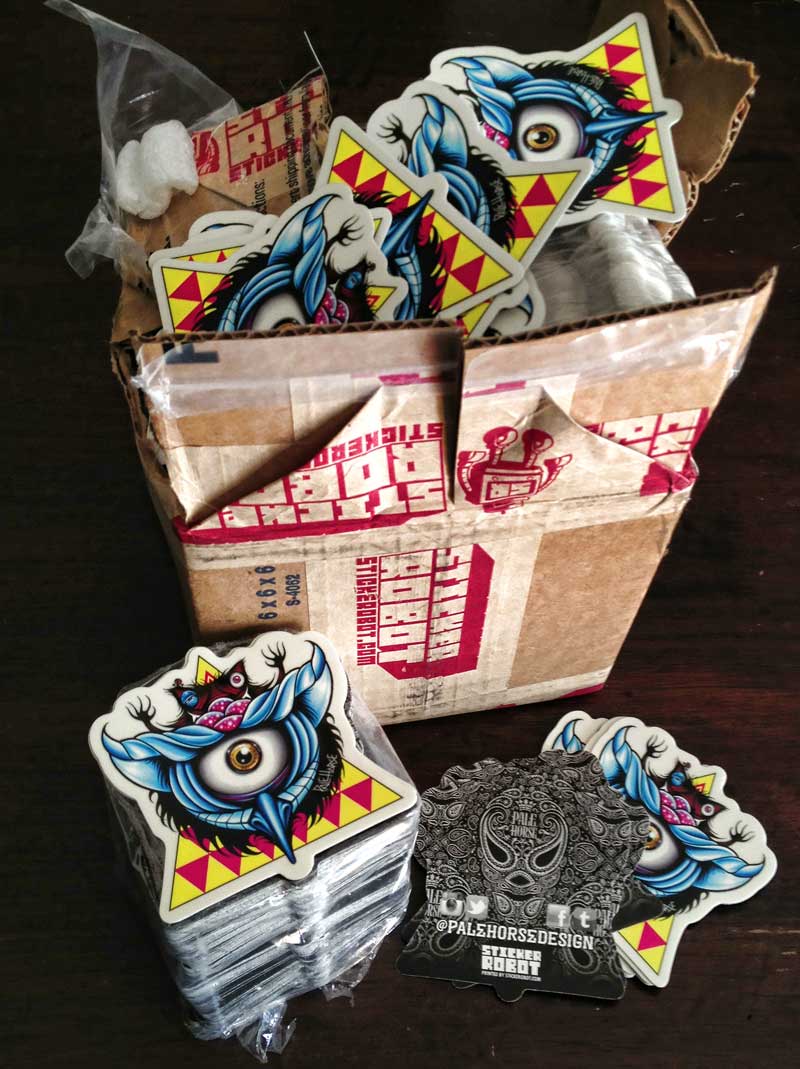
Thanks for following along and I hope you enjoyed seeing how I blasted out this laptop sticker! Hopefully it inspires you to create your own pile of new stickers soon!
If you’d like to see more of my work, purchase, t-shirts, prints, stickers and more, check out www.palehorsedesign.com You can also connect me on Instagram, Facebook, Twitter & Tumblr for non-stop updates and progress shots of new artwork and other custom vinyl stickers.
Ok, Who Wants a Laptop Sticker ?
Head over to the PaleHorse Website and pick up a couple Laptop stickers! He’s got a sweet new “Jaguar” Design as well!

remember to leave a comment below & tell us what you think…